
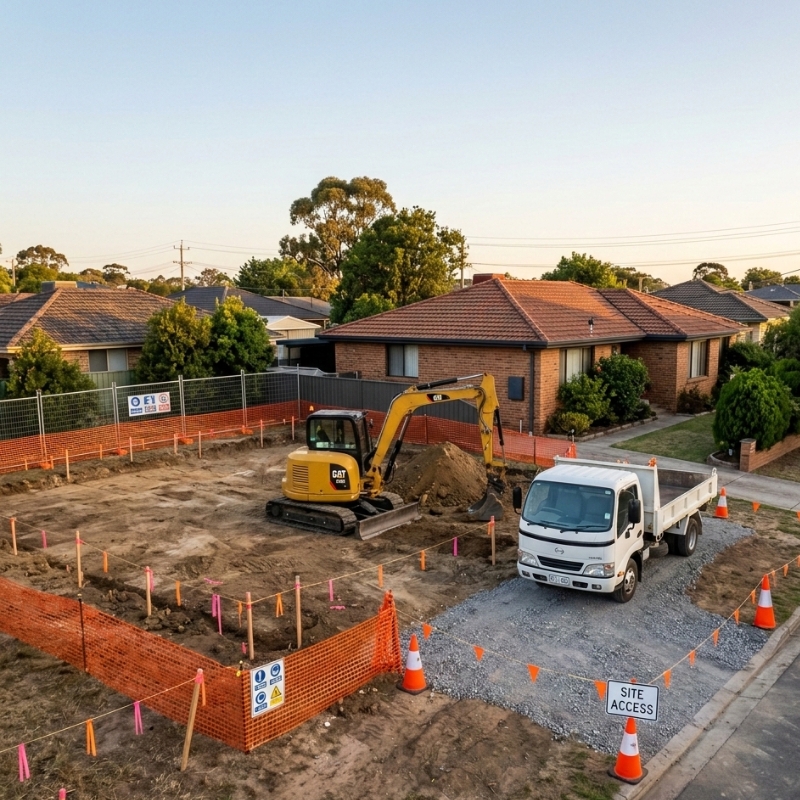
If you’ve got earthmoving booked for a backyard upgrade, a driveway rebuild, drainage work, or a new build, a little preparation goes a long way. Even when the job is “just digging”, excavation touches everything under and around your property—services, access, drainage, boundaries, neighbouring structures, and the way water moves across your block. This checklist is built for homeowners across Newcastle, the Hunter Valley, Sydney and the Central Coast who want the works to run smoothly, safely, and with fewer last-minute surprises.
What “site prep” really means for residential digging
For homeowners, “site prep” is less about doing the operator’s job and more about removing uncertainty.
You’re aiming to:
• Confirm what’s under the ground before anything is disturbed
• Make it easy (and safe) for machinery and trucks to access the work area
• Protect the things you don’t want damaged (driveways, fences, gardens, services, pets)
• Ensure the finished ground levels and drainage outcomes match what you actually need
• Reduce delays caused by rain, access issues, unclear boundaries, or unexpected spoil
The biggest causes of avoidable delays
On residential blocks in NSW, the most common hold-ups usually come from:
• Unknown underground services (or missing/old plans)
• Tight access that wasn’t measured properly
• Spoil volumes underestimated (nowhere to stockpile, extra truck movements)
• Wet-weather turning the site into a bog (especially on clay)
• Confusion over boundaries, easements, and what can be touched
• Last-minute changes because the end goal wasn’t clear (levels, falls, where water should go)
The homeowner’s pre-start checklist for earthmoving and digging
Work through these in order. The early steps prevent the biggest safety and rework risks.
1) Confirm your “why” and your end point (before anything gets pegged)
Before you talk to machines, get crystal clear on outcomes:
• What are you trying to achieve—level pad, driveway base, drainage run, retaining prep, pool area, landscaping levels?
• What is “finished level” meant to be in each area (and relative to what—house slab, boundary, existing path)?
• Where should water end up after the job—street kerb, a pit, an approved discharge point?
If you have plans (builder/engineer/landscaper), have them ready. If you don’t, write a simple scope in plain language so everyone is aligned.
Q&A: Do I need plans for residential earthworks?
Not always—but you do need clarity. If you’re shaping ground that affects drainage, structures, or neighbouring property, even a basic sketch with key levels can prevent expensive “undo and redo”. For retaining walls, structural elements, or major cut/fill on sloping blocks, professional advice is often essential.
2) Treat safety like a pre-start item (not an afterthought)
Before anyone digs, it helps to understand the core risks that sit behind “normal” residential earthmoving—like trench collapse, falling loads, mobile plant movement, and working near services. Safe Work Australia’s overview is a solid baseline for what can go wrong and why controls matter, even on smaller jobs: Safe Work Australia – Excavation hazards
What you can do as a homeowner to support safer conditions:
• Keep kids and pets completely away from the work zone
• Agree on a clear entry/exit path for machinery and trucks
• Keep the operator’s line of sight clear (don’t store items near edges or access points)
• Don’t allow anyone (including you) to stand near the edge of open excavations
• Identify and communicate any known hazards: slippery slopes, soft ground, overhead lines, unstable retaining walls, and low branches
Q&A: Isn’t safety the contractor’s responsibility?
Yes—but a homeowner can still create risk by leaving access cluttered, allowing people into the work zone, or making last-minute changes that encourage shortcuts. The best jobs are the ones where safety planning is easy to follow from minute one.
3) Know your boundaries, easements, and “do not touch” zones
Before any digging near fences, side passages, or the front boundary:
• Confirm boundary lines (survey info is best)
• Identify easements (stormwater, sewer, access) that restrict what can be done
• Note neighbouring retaining walls, sheds, driveways, and anything close to the dig zone
If the work is within a tight margin of structures, fences, or boundary lines, it’s worth treating it like a precision job—not a “quick scrape”.
Practical tip
Walk the boundary and look for clues:
• Survey pegs (if present)
• Changes in fence line direction
• Different paving/concrete ages
• Existing pits, lids, or inspection points near the boundary
4) Measure access like a grown-up (not a guess)
Tight access is one of the biggest residential constraints across older Newcastle suburbs, inner Sydney blocks, and compact Central Coast lots.
Confirm:
• Gate width (narrowest point)
• Side passage width and any pinch points (air con units, taps, steps, downpipes)
• Height clearance (eaves, pergolas, carports, tree branches)
• Turning space for trailers/trucks
• Street access and parking restrictions (especially on narrow streets)
Also consider:
• Where machines will track
• Where trucks will park/load
• Whether surfaces need protection (pavers, decorative concrete, asphalt edges)
Q&A: What if access is too tight?
Tight access doesn’t automatically stop the job—it changes the plan. Options can include smaller machines, staged spoil removal, temporary fence panel removal, or working from the street side (if feasible). The key is measuring early so you’re not scrambling on day one.
5) Decide what stays, what goes, and what gets protected
Walk the site and mark:
• Items to remove (pots, furniture, trampolines, garden edging, irrigation heads)
• Items to protect (hot water units, AC condensers, downpipes, rainwater tanks, pool equipment)
• “No-go” zones (trees, garden beds you want preserved, fragile retaining)
If you’ve got pets or kids:
• Plan a secure separation zone
• Keep gates locked and visible signage up
• Agree on a safe walkway for household movement
Driveway and path protection
If the machinery will cross a driveway or paved area:
• Confirm where the weight will be borne
• Protect edges (where cracking often begins)
• Plan for mud control (so you’re not pressure-washing the street afterwards)
6) Clarify spoil: how much, where it goes, and what “clean fill” means
Spoil is the hidden budget-buster and logistics killer.
Confirm:
• Approximate volume of material to be removed
• Whether material can be reused on-site (and where stockpiles can safely sit)
• Whether it’s clean fill, mixed fill, clay, rock, or contaminated risk (older sheds/garages can hide surprises)
• Truck access for removal and where trucks will load
Homeowner decisions that help:
• Choose a stockpile zone that won’t block access or trap water
• Keep spoil away from fences and tree root zones
• Avoid stockpiling where it could slump onto a neighbour’s property in the rain
Q&A: Can I keep the soil for landscaping later?
Sometimes—especially if it’s clean and not overly clay-heavy. But “keeping it” still requires a safe stockpile location, and wet clay can become unusable quickly. If your end goal is a lawn or garden, you may need imported topsoil later, even if you keep some fill.
7) Confirm levels, falls, and drainage intent before the first bucket goes in
This is where homeowners often regret not asking earlier: “I wanted it flatter” or “Why is water running toward the house now?”
Confirm:
• What is the target level relative to the house, paths, and boundaries?
• Where is water meant to flow after shaping?
• Are you creating a level pad or a controlled fall for drainage?
• Do you need a swale, spoon drain, trench, or pit connection?
NSW reality check:
• Heavy rain events happen. A “nearly flat” surface can still pond if falls aren’t deliberate.
• Clay soils common around Newcastle and parts of the Hunter can hold water and turn boggy fast.
Quick homeowner test
After rain, note:
• Where water naturally ponds
• Where it exits the site (or doesn’t)
• Any damp spots near slab edges, steps, or retaining walls
Bring those observations into the pre-start conversation.
8) Consider soil conditions and rock risk (especially in Newcastle and surrounds)
Across Newcastle and the Hunter, it’s not unusual to hit:
• Reactive clay
• Sand pockets
• Shale/rock layers
• Old fill from previous works
Why it matters:
• Clay changes how you manage wet weather and compaction
• Rock changes time, tooling, and spoil handling
• Mixed fill can be unstable for pads if not managed properly
Q&A: Will the operator know what’s under the ground?
They can often read soil as they go, but they can’t predict every layer before digging starts. If your project depends on a stable base (driveway, slab prep, retaining), it can be worth getting appropriate professional input if conditions are uncertain.
9) Plan for wet weather like it’s going to happen (because it will)
Wet-weather planning is underrated and very NSW-relevant.
Before works:
• Pick a stockpile location that won’t become a dam
• Identify where runoff will go during the job
• Keep a clear path for machines (bogging wastes time fast)
• Have a simple mud-control plan for the street/driveway
If the site is clay-heavy:
• Expect it to become slippery and sticky
• Allow for extra clean-up time
• Avoid creating ruts that later need re-grading
10) Communicate with neighbours (especially if you share fences or access)
A quick heads-up avoids friction:
• Let neighbours know dates and expected noise/truck movements
• Confirm there’s no shared drainage line you’re unknowingly affecting
• If fence panels need temporary removal, discuss it early and document the agreement
Q&A: Do I need neighbour permission?
If you’re staying entirely on your property and not impacting shared structures, usually no. But if access, fence removal, or shared drainage is involved, it’s much safer to agree in writing (even a simple text/email trail).
11) The day-before checklist (small things that prevent big headaches)
The day before machines arrive:
• Clear the access path completely (including low branches)
• Move vehicles off the driveway/street frontage if trucks need room
• Mark “keep” items with tape/flags (plants, edges, features)
• Confirm where spoil will sit and where trucks will load
• Take pre-start photos of fences, paths, driveway edges, and gardens
• Secure pets and plan a safe household route
If you want to see what this kind of work typically includes on residential blocks locally, start here: excavation services in Newcastle
12) The morning-of checklist (what to confirm before the first dig)
In the morning:
• Confirm the scope in one sentence (what success looks like)
• Walk the site with the operator and point out:
• service entry points
• “no-go” zones
• desired stockpile area
• any fragile surfaces
• Reconfirm levels/falls and where water should go
• Keep kids/pets inside or safely separated
• Keep your phone handy for quick decisions (small choices pop up fast)
A simple way to keep the day running smoothly is to align early on safety, access, spoil and levels—the same fundamentals covered in trusted excavation solutions in Newcastle, so expectations stay realistic from the start.
Common homeowner mistakes (and how to avoid them)
Mistake 1: “We’ll figure out the drainage later”
Drainage is easiest to get right while the ground is open. Even if you’re not installing final surfaces yet, shaping falls and setting allowances early saves rework.
Mistake 2: Underestimating spoilage
If you don’t have a plan for spoilage, the job can stall. Stockpiling without thought can also damage fences, trees, and create water issues.
Mistake 3: Assuming access is “close enough”
A 50 mm pinch point can stop a machine. Measure the narrowest point, not the average width.
Mistake 4: Not protecting edges
Driveway edges, pavers, and garden borders are where damage happens. Decide what needs protection before machinery arrives.
Mini guide: What to prepare depending on your project type
If you’re prepping for a driveway or parking area
Focus on:
• Base depth and compaction expectations
• Runoff direction (you don’t want water flowing into garages)
• Edge support (so it doesn’t crumble over time)
• Truck access for material deliveries
If you’re fixing drainage or installing stormwater
Focus on:
• Service checks and existing pipe routes
• Fall direction and discharge point
• Where pits will sit (and how they’ll be maintained)
• Minimising disturbance near foundations
If you’re creating a level pad on a sloping block
Focus on:
• Cut and fill balance (what’s removed vs what’s imported)
• Retaining requirements (where ground is held back)
• How water will behave above and below the pad
• Erosion control if rain hits mid-job
Final FAQ
How early should I start site prep before earthmoving?
Aim for 3–7 days beforehand. That gives you time to gather service info, clear access, plan spoil, and sort out any surprises without rushing.
What should I photograph before digging starts?
Take wide shots and close-ups of:
• fences and fence bases
• driveway edges and paths
• garden features you want preserved
• visible service points (meters, pits, inspection openings)
• any existing cracks or damage (so there’s no confusion later)
Can I stay home during the works?
Usually yes, but keep well clear of the work zone. Set up a safe boundary and a clear “no-go” area—especially for kids and pets.
What’s the single most important thing to confirm?
Underground services. It’s the biggest safety risk and the fastest way a job can go sideways.
How do I know if my block might have rock?
Neighbouring properties, visible outcrops, and local area knowledge can hint at it, but the only certainty is what you encounter as digging progresses. If your project is sensitive to time or tooling, discuss the risk possibility up front.
What if I want to change the plan once work starts?
Small tweaks are common, but big changes can affect levels, spoil volumes, drainage outcomes, and time. It’s best to confirm the “end point” before the first bucket goes in.
If you want the broader context around safe planning, responsibilities, and what to confirm before ground disturbance, you can learn more about responsible excavation and use it as a reference point while you work through the checklist.